Encountering issues with QuickBooks Multi-User Mode not working can bring productivity to a halt and disrupt your business operations. This common problem can arise due to various reasons ranging from network issues to incorrect QuickBooks configuration settings. In this article, we’ll dive into the root causes of why Multi-User Mode might fail and provide step-by-step solutions to get your QuickBooks running smoothly again. Whether you’re a small business owner or an accountant, understanding how to troubleshoot and resolve this issue swiftly ensures minimal downtime and maintains the continuity of your financial management tasks. Let’s explore the most effective methods to fix QuickBooks Multi-User Mode and ensure your team can collaborate efficiently without any hiccups.
What is QuickBooks Multi-User Mode Issue?
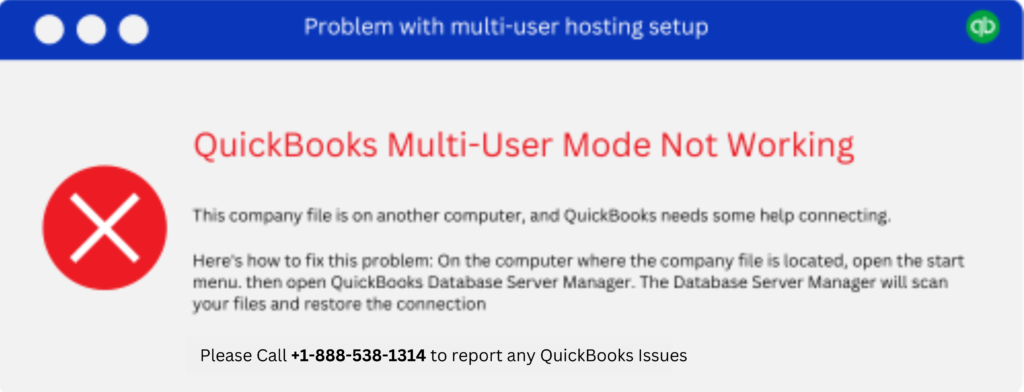
The QuickBooks Multi-User Mode Not Working Issue, notably represented by Error H202 or H505, occurs when there is a failure in communication between the server hosting the company file and the client machines trying to access it. This error is primarily triggered by incorrect network setup or server configuration errors that prevent users from accessing the database in a multi-user environment. The resolution typically involves adjusting hosting configurations, modifying firewall settings to allow necessary network access, and ensuring proper DNS setup to facilitate efficient and error-free connectivity.
Reasons QuickBooks Is Unable to Use Multi-User Mode
Understanding below common obstacles can help in identifying and resolving QuickBooks Multi User Mode Not Working more efficiently, ensuring that the multi-user environment is stable and reliable.
- Network connectivity problems may disrupt communication between devices.
- The host computer for the QuickBooks database server is not set correctly.
- Incorrect folder permissions prevent sharing of company files.
- The QuickBooks Database Server Manager is not running on the server.
- Firewall settings on the network are blocking QuickBooks communication.
- The server and all workstations are not on the same domain or network.
- Necessary services like QBCFMonitor or QBDBMgrN are not running.
- DNS settings are improperly configured, leading to connection issues.
- The company file is damaged, which blocks multi-user access.
- QuickBooks software on client machines is outdated.
- Conflicting third-party software interrupts QuickBooks operations.
- Windows file permissions are set incorrectly, restricting access.
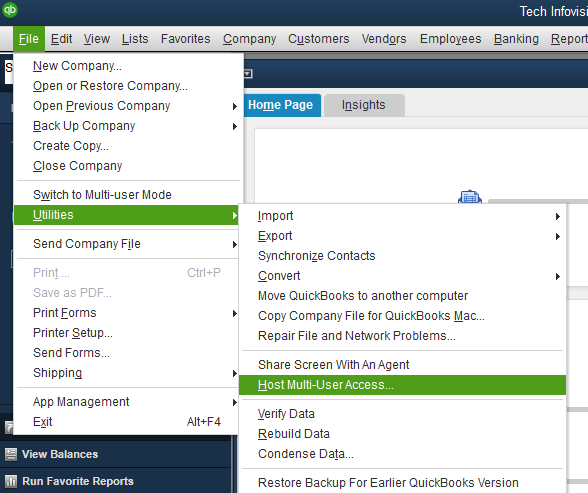
Easy-Peasy ways to eliminate QuickBooks Multi-User Mode Not Working Error
You now understand what the QuickBooks Multi-User Mode issue is and its common causes. Here are the solutions to fix it right away:
Method 1: Verify Network Connectivity Settings
- Ensure all computers can access the internet by checking the Wi-Fi or Ethernet symbol on each computer to see if it shows a stable connection.
- Reboot the router to resolve common connectivity issues by turning it off, waiting about one minute, and then turning it back on. This can help clear up network glitches.
- Check if your computer can communicate with the server using a ping test. Open the Command Prompt by typing
cmdin the computer’s search box and clicking on the app. Then typepingfollowed by the server’s IP address (e.g.,ping 192.168.1.1). If it reports “Request timed out,” it indicates a problem in network communication. - Verify that all network cables and ports are secure and functional. For wired connections, ensure Ethernet cables are firmly connected and not damaged. For wireless connections, ensure the device is within a good range of the Wi-Fi router. If connectivity issues persist, try moving closer to the router or removing physical obstructionss.
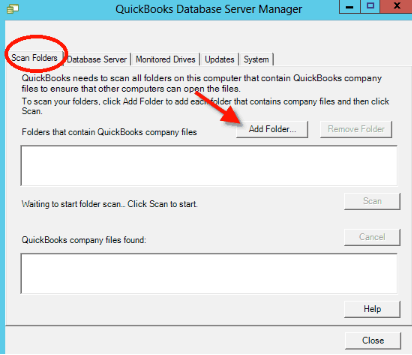
Method 2: Check QuickBooks Server Manager
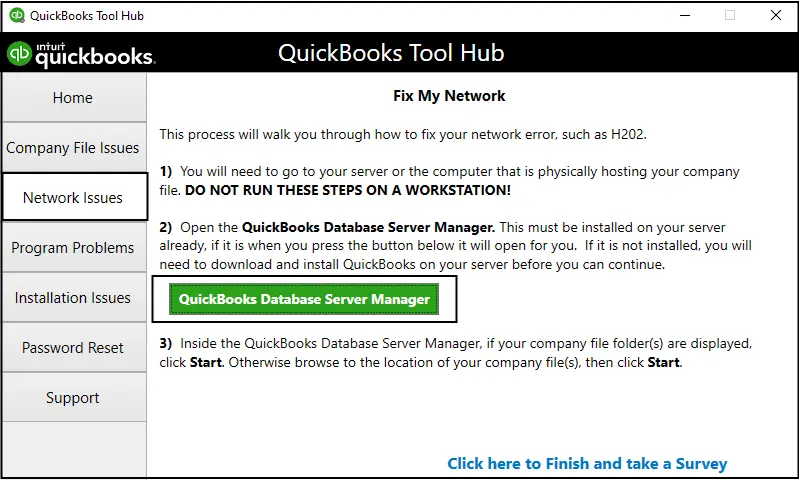
- After opening QuickBooks Database Server Manager, use the “Scan Folders” tab to rescan the folders containing your QuickBooks company files. This ensures that any new files or changes are recognized by the network.
- Regularly check the service status in the Windows Services panel to ensure the QuickBooksDBXX service is running.
- Ensure that the QuickBooks Database Server Manager is updated to the latest release that corresponds with your QuickBooks version.
- Verify that the server is set up to share the connection properly with all workstations.
- Utilize the built-in network diagnostic tools within the Database Server Manager to troubleshoot network issues.
- After making changes, restart the server to apply settings and refresh connections.
- Review the log files generated by the Database Server Manager for any error messages or warnings.
- Ensure that the QuickBooks Database Server Manager is correctly installed and configured, particularly after updates or system changes.
Method 3: Configure Firewall and Antivirus Settings
- Ensure TCP/IP ports used by QuickBooks for incoming and outgoing data are open specifically for the versions in use.
- Add QuickBooks executable files (.exe) to the allowed list in both firewall and antivirus programs.
- Test by temporarily disabling the firewall to see if QuickBooks connects in multi-user mode, then re-enable with proper settings.
- Adjust the network protection levels in your antivirus to ensure they are not overly restrictive for QuickBooks operations.
- If unsure, consult your firewall/antivirus vendor or a professional for the specific steps to add exceptions for QuickBooks.
- Ensure no network hardware or security settings are blocking communication between host and client machines.
- Keep your firewall and antivirus software updated to maintain compatibility with QuickBooks updates.
- Check the firewall and antivirus logs to see if they have recently blocked QuickBooks processes.
Method 4: Use QuickBooks File Doctor
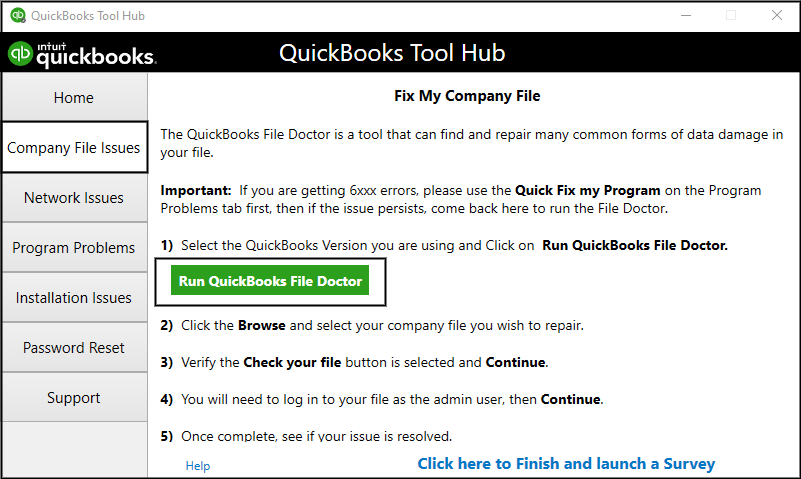
- Ensure you download the latest version of QuickBooks File Doctor directly from Intuit’s official site.
- Run the tool as an administrator to ensure it has the necessary permissions to make changes.
- Allow the tool to perform a comprehensive scan; this might take some time depending on the size of the file and the speed of your system.
- Carefully review the results provided by File Doctor and apply any recommended fixes.
- Ensure that the tool checks both network connectivity and file integrity.
- If issues persist, run File Doctor multiple times to catch issues that may not have been detected in an initial scan.
- Always backup your company file before using repair tools to avoid any potential data loss.
- Access File Doctor through the QuickBooks Tool Hub for a more integrated solution approach.
Method 5: Verify Hosting Settings
- On every workstation, verify individually that they are not set to host the company files. This is crucial as multiple hosts can create conflicts.
- Ensure that when turning off hosting on each workstation, you receive confirmation that it is turned off.
- Regularly check settings after updates or software reinstalls, as these can sometimes revert to default configurations.
- On the main server, ensure that it indicates it is hosting the files. This is usually shown in the system tray or within QuickBooks settings.
- Make sure network discovery is enabled on all machines to ensure visibility in the network.
- Check that Windows permissions for network sharing are appropriately set and consistent across the network.
- Ensure that the machine set to host has admin rights to effectively manage multi-user access.
- After changing hosting settings, it’s often helpful to restart QuickBooks on all machines to refresh the settings.
Method 6: Restart QuickBooks Services
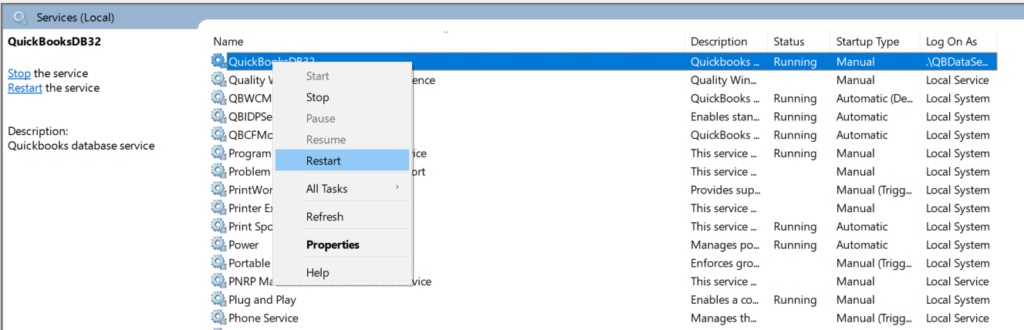
- Check for any dependent services that might also need restarting when the QuickBooksDBXX service is restarted.
- Set the QuickBooksDBXX service to start automatically to avoid manual starts after each reboot.
- Verify that the service account used by QuickBooksDBXX has appropriate permissions.
- Look for any error logs generated by the service for clues on what might be causing the issue.
- Ensure that the server has adequate memory and resources allocated to handle QuickBooks operations efficiently.
- Check for updates specifically related to the QuickBooksDBXX service, as patches can resolve known issues.
- Ensure that the server’s network profile is set to private or home, not public, for better connectivity.
- Verify that the specific ports QuickBooks uses for networking are open and not blocked by any internal policies or other software.
Method 7: Check Folder Permissions
- Ensure explicit “read/write/create/delete” permissions are granted to all QuickBooks users on the network for the folder containing the company file.
- Verify that the network share has the correct ownership settings, often needing to be owned by the QuickBooks server administrator.
- Check that necessary permissions are inherited correctly down the directory tree where the QuickBooks company file resides.
- If applicable, review group policy settings that might override local permissions settings.
- Use tools like Windows Security to audit permissions and ensure they are applied correctly.
- Make sure SMB/CIFS file sharing protocols are enabled and properly configured.
- Utilize security groups for easier management of permissions if multiple users need access.
- Test with different user profiles to ensure that permissions are uniformly applied and effective.
Method 8: Create a New Network Data File
- Before deleting the old ND file, make a backup in case it needs to be restored.
- After deleting, open QuickBooks Database Server Manager and rescan the folder to automatically recreate the ND file.
- Ensure that the ND file is located in the same directory as the company file (.QBW).
- After creating a new ND file, check the integrity of the company file to ensure no data corruption.
- Ensure that there are no multiple ND files for the same company file, as this can cause conflicts.
- Verify that the newly created ND file is accessible by all intended workstations.
- Check server and QuickBooks logs to ensure that the new ND file is recognized and being used.
- Perform a connection test from each workstation to the server to ensure the new ND file is functioning correctly.
Final Summary:
QuickBooks Multi-User Mode not working can be frustrating, but with the right approach, it is usually fixable. By following the troubleshooting steps outlined above, you can resolve most issues related to this problem. Regular maintenance and updates will further enhance your experience and help avoid similar problems in the future. If you continue to experience difficulties, consider reaching out to a QuickBooks Data Recovery Service team +1-888-538-1314 who can provide more personalized support.